
Intro
Moving data from one location to another sometimes could be complicated and challenging. Occasionally, the distance that your project needs to cover is out of the range of normal radio specifications. If we talk about CC1101 scenarios, we could talk about many different factors that could affect the communication: from frequency, dBm limitations to a clear and flat environments.
Even some restrictions and limitations in hardware and software should be considered to expand the link between the two radios connection. Some of the ideas and libraries of this post come from my last SDR post with Raspberry Pi and CC1101.
The idea
Imagine that you have to move data from the location of Raspberry Pi #1 to Raspberry Pi #2 but the distance is the problem. How you can design something cheap and adequate to use it as “Extender”?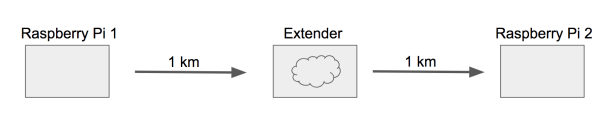
Hardware
If you make a research about different SDR radios or possible alternatives, LoRa radio technology could be an option. Also the nrf24l01 radio is a good alternative which implements high frequency(2.4GHz), and it is cheap as well.
I prefer to use the CC1101s because their library is very stable for Raspberry Pi; and the most important part is that I can use them in different frequencies: 315, 433, 868, 915 MHz if I decide to implement another projects with them.
Software
The SpaceTeddy library is our best option to implement the “Extender” idea with Raspberry Pis.
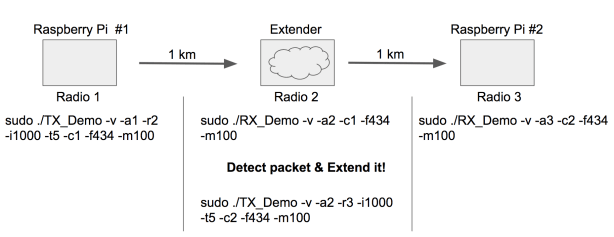
The “Extender” is going to be another Raspberry Pi with a CC1101 radio as well. To do this, we have to enumerate the radios to know where to send the packets or from where we will receive them:

So let’s understand the commands to initialize the communication between the transmitter, extender and receiver from the library:
Command Line parameters
TX_Demo:
CC1100 SW [-h] [-V] [-a My_Addr] [-r RxDemo_Addr] [-i Msg_Interval] [-t tx_retries] [-c channel] [-f frequency]
          [-m modulation]

  -h              			print this help and exit
  -V              			print version and exit
  -v              			set verbose flag
  -a my address [1-255] 		set my address
  -r rx address [1-255] 	  	set RxDemo receiver address
  -i interval ms[1-6000] 	  	sets message interval timing
  -t tx_retries [0-255] 	  	sets message send retries
  -c channel    [1-255] 		set transmit channel
  -f frequency  [315,434,868,915]  	set ISM band
  -m modulation [100,250,500]           set modulation
Example,
sudo ./TX_Demo -v -a1 -r3 -i1000 -t5 -c1 -f434 -m100
RX_Demo:
CC1100 SW [-h] [-V] [-v] [-a My_Addr] [-c channel] [-f frequency] [-m modulation]
-h              			print this help and exit
-V              			print version and exit
-v              			set verbose flag
-a my address [1-255] 		set my address
-c channel    [1-255] 		set transmit channel
-f frequency  [315,434,868,915]  	set ISM band
-m modulation [100,250,500]           set modulation
Example,
sudo ./RX_Demo -v -a3 -c1 -f434 -m100We are going to use the default frequency: 434
- -a for address
- -c for channel
- -r for the receiver
Implementation
- From Radio 1, we should run the command in this way:
sudo ./TX_Demo -v -a1 -r2 -i1000 -t5 -c1 -f434 -m100
We want to transmit our data from radio 1(-a1) to the extender which is the radio 2(-r2) in the channel 1(-c1)
- From the Extender with Radio 2, we should run it like this:
sudo ./RX_Demo -v -a2 -c1 -f434 -m100
We want to receive our data in channel 1(-c1) and the extender has the radio is 2(-a2)
and after we receive the packet, we extend it to the radio 3, of course at this point you have to design a small program that does this for you automatically:
sudo ./TX_Demo -v -a2 -r3 -i1000 -t5 -c2 -f434 -m100
We want to transmit our data from radio 2(-a2) to the radio 3(-r3) in the channel 2(-c2)
- We receive the packet in the radio 3, running the code in this way:
sudo ./RX_Demo -v -a3 -c2 -f434 -m100
We want to receive our data in channel 2(-c2) and the Raspberry #2 uses the radio #3(-a3)
Do you notice that I changed the communication channel from the “Extender” to the radio 3? Commonly, this is what a normal extender does in the WiFi environments, so let’s keep it classy:
Conclusions
You can implement cheap hardware to extend the signal of your projects; sometimes, the project cost not should be a problem when you use imagination and software.
